
How to connect WordPress to ARIQ
Two parts: an Application Password connects the site, and the free ARIQ Connector plugin sends ARIQ every form lead, page, blog post and plugin from the site itself, so a security plugin like Wordfence blocking outside access can't leave anything out.
Who connects WordPress
The connection is saved on one project. An agency connects each client from that client's project. A business connecting its own account uses its own project. Both follow the same Connect button.
Sign in to ARIQ with your agency user. Open the client project, then connect that client's WordPress account. The client does not need an ARIQ login. Use the WordPress login that can already see that client's data.
Sign in to ARIQ, open your project, and connect the WordPress account this business already uses. You approve access with that same account.
Connect it inside ARIQ
- 1Sign in to ARIQ.
- 2Open the project this account belongs to. Switch projects from the left sidebar if you manage more than one client.
- 3Open WordPress from the workspace tabs, or go straight to the WordPress page.
- 4Click Connect. ARIQ asks for the key from the WordPress account. Copy it from WordPress, paste it into ARIQ, and save. The key is stored on this project.
- 5Stay on that project and sync. The page shows live numbers only after this account is connected. Another client's project stays empty until you connect it there too.
Step by step
- 1
Create an Application Password
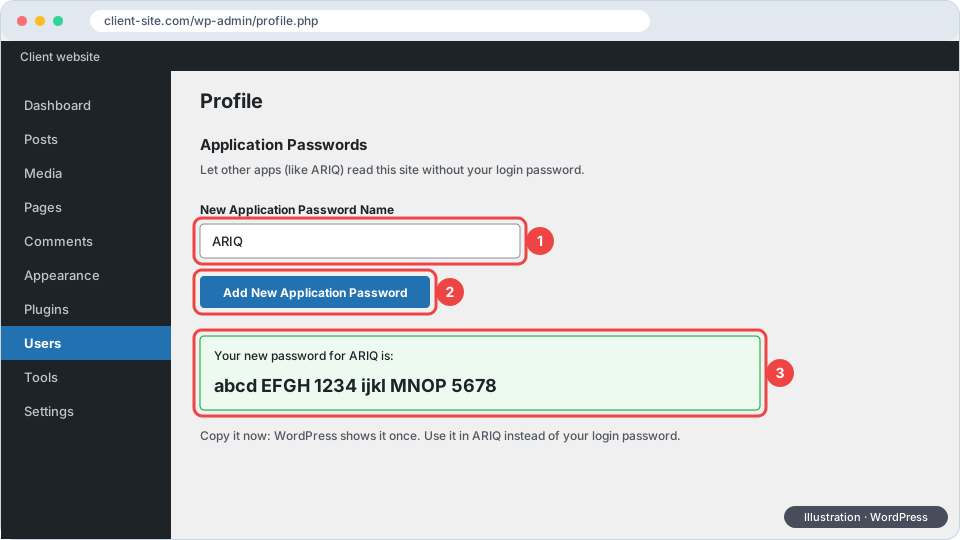
In WordPress open Users → Profile, scroll to Application Passwords, type ARIQ and click Add New Application Password. Copy the password WordPress shows (it's shown once). This is not your login password, and you can revoke it any time.
- 2
Connect the site in ARIQ
Open the client in ARIQ, then Integrations → WordPress → Connect (or CRM → WordPress). Enter the site address with https://, the WordPress username and the Application Password, then Connect.
- 3
Install the ARIQ Connector plugin
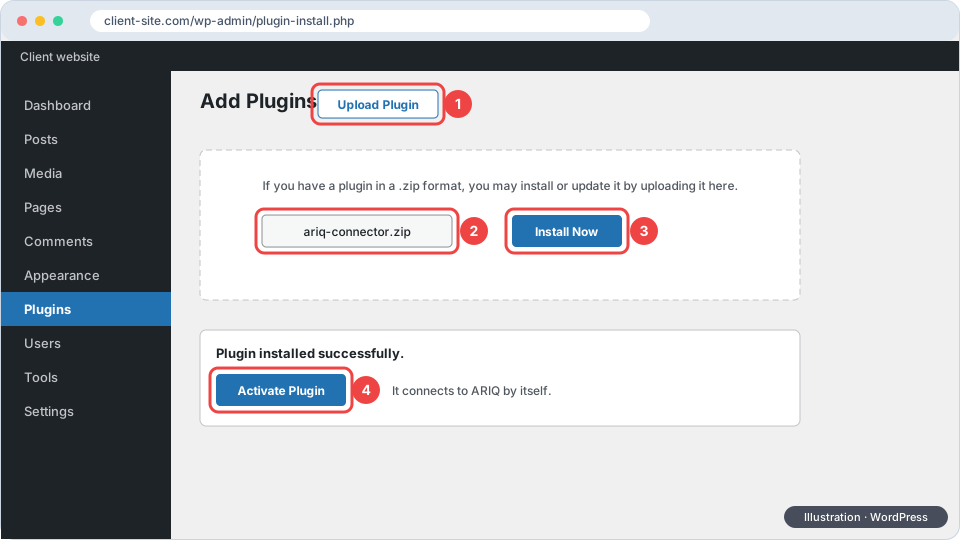
At the top of the client's WordPress page in ARIQ, click Download plugin. In WordPress go to Plugins → Add New → Upload Plugin, choose the downloaded file, Install Now, then Activate. It connects to ARIQ by itself: the file already carries this site's private key.
- 4
Check the counts
In ARIQ, Connection & Webhook shows each form plugin with leads in ARIQ against entries on the site (for example 194 / 194). New entries arrive within seconds; pages, posts and plugins whenever they change.
What the ARIQ Connector sends
- Every entry from Contact Form 7 (with Flamingo or CFDB7), WPForms, Gravity Forms, Ninja Forms, Fluent Forms, Formidable, Elementor, Jetpack, MetForm, Avada and Bricks, with each field's real name (First Name, Phone Number…).
- Forms that save nothing on their own (Divi and Beaver Builder contact forms, Contact Form 7 alone, WPForms Lite, Elementor without Collect Submissions, Forminator, Everest, Kadence) from the moment it's active.
- Pages, blog posts (including blogs kept in their own post type) and plugins with their versions and available updates (titles and dates only, never page content), sent the moment a post is published, updated, scheduled or deleted.
- Spam and deleted entries are left out, as in each form plugin.
Good to know
- Application Passwords need WordPress 5.6 or newer and HTTPS. Spaces in the password are fine.
- When ARIQ shows a plugin update, download it again and upload it the same way: it replaces the old copy and keeps its connection.
- Every message between the site and ARIQ is signed with the site's own key; a request without it is refused.
- WooCommerce orders need WooCommerce REST API keys (Settings → Advanced → REST API), added under the WordPress page's Orders tab.